
Most of you might be thinking why am I bound to administrator privilege only while I can become a Super User on your favorite Samsung Galaxy Ace 3. This thought resulted in writing a rooting tutorial for Samsung Galaxy Ace 3 GT-S7272 and GT-S7270.
These are very simple steps to root your smartphone, actually which is so simple that your kid can do it in a minute or two.
Table Of Contents
Warning!
Please note that rooting will void your warranty (you can always revert the warranty by unrooting) on Galaxy Ace 3 GT-S7272 or GT-S7270, so please proceed at your own risk. SamsungSFour.Com will not be liable for any damaged caused as a result of executing the below given steps.
Prerequisites
Before proceeding further please make sure that your device is charged to at least 80% and all the personal files in the phone memory are copied to a safe place including contacts, photos etc..
Steps to root your Galaxy Ace 3 (GT-S7272 & GT-S7270)
- First you need to download all the files necessary for the rooting procedure from the below given links,
Please download all the above given files to your PC desktop.
- Once the files are downloaded you need to copy the “root.zip” file to your Galaxy Ace 3 sdcard root folder.
- Now install Samsung USB drivers on your PC
- Once you have installed the drivers enable “USB debugging mode” on your Galaxy Ace 3 and switch it off.
- Now enter it in “Download Mode“.
- To enter Samsung Galaxy Ace 3 in “Download Mode” press and hold “Home”+”Volume Down” and press “Power” buttons until you see a warning screen like the one given below,

Once you get the above screen press “Volume Up” button on your phone and you ace 3 will enter in “Download Mode”. Please refer the below given screenshot to confirm whether you are in “Download Mode” or not.

- Once you are in “Download Mode” open Odin and connect the Galaxy Ace 3 using USB cable to your PC. If the connection was successful you will get an “Added” message in Odin.
- Now click “PDA” and select “touch.tar” . Make sure that “Auto Reboot” and “F. Reset Time” are check marked in “Odin” like shown below,
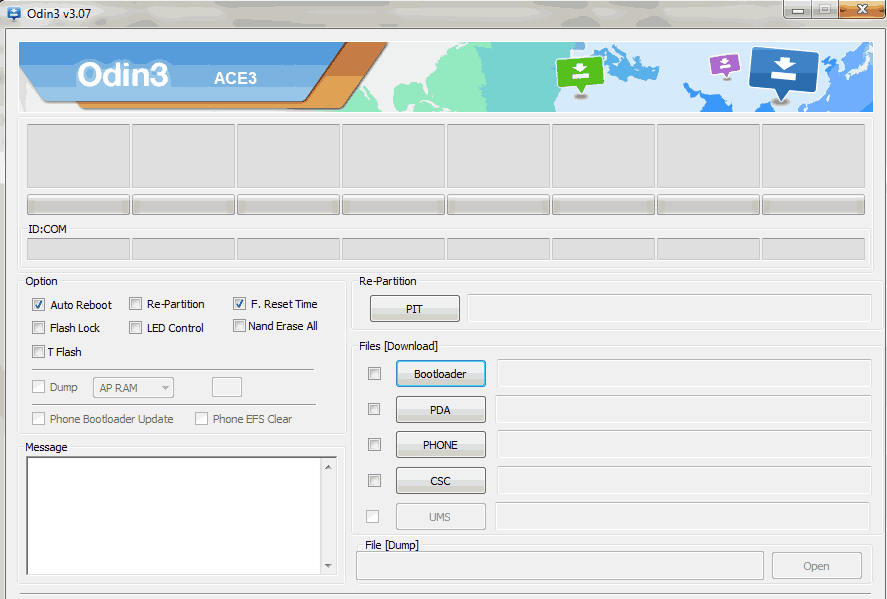
- Once you are confirmed with everything click “Start” button in the Odin window and wait for the flashing process to complete. When completed your Samsung Galaxy Ace 3 will restart and you will get a “Pass” message from Odin window.
- Now the real rooting process starts. For that switch of your mobile and enter it in “Recovery Mode“. To enter Galaxy Ace 3 in “Recovery Mode” press and hold “Home”+”Volume Up” and “Power” button at the same time until you see a similar screen like the one given below,

When you are in “Recovery Mode” use “Volume Up” and “Volume Down” button to scroll through the menu options and use “Power” button to select/confirm.
- Once you are “Recovery Mode” select “install zip from sdcard” option and select “choose zip from sdcard” in the next window.
- Now select the “root.zip” file you have copied to your phones sdcard before. Please select “Yes” when you are asked for confirmation.
- The rooting process will now start, wait for it to get finished. Once finished select “reboot system now” from the main menu of the recovery mode.
That’s it guys, once your Samsung Galaxy Ace 3 is rebooted it will be rooted with super user privileges…..Enjoy the maximum out of it.
If you have faced any issue while rooting your Galaxy Ace 3, please feel free to post it in the comment section below, don’t worry I will help you as fast I can.
If “How To Root Samsung Galaxy Ace 3 GT-S7272 and GT-S7270?” tutorial really helped you, please give a like/share on social networking websites by using the below given buttons.