
Hi friends, this tutorial will help you to install Stock ROM on Samsung Galaxy A6+ (2018), for all models.
The Samsung Galaxy A6+ which is also known as Samsung Galaxy A9 Star Lite in China and Galaxy Jean in Korea is a recently released android smartphone from the Korean mobile phone giant. It has a massive 6 inches Super AMOLED capacitive touchscreen display having 1080 x 2220 pixels resolution. It is factory installed with Android Oreo 8.0 guaranteeing lag free operation at heavy gaming conditions.
As I already mentioned this phone’s Stock ROM is the Android Oreo 8, so our objective here is to help you to install it on your device.
Please note that this tutorial is only compatible for Samsung Galaxy A6+ SM-A605F, Samsung Galaxy A6+ SM-A605FN, Samsung Galaxy A6+ SM-A605G, Samsung Galaxy A6+ SM-A605GN, Samsung Galaxy A6+ SM-A6050 and Samsung Galaxy A6+ SM-A605K.
Below given are some common standard educational details regarding these kind of tutorials.
On a further note this tutorial is for those who are experiencing any kind of the below mentioned issues.
- Whoever who wants to go back to the Stock Android Oreo 8.0 firmware on your Galaxy A6+.
- Someone who is experiencing some issues after updating/rooting etc on your Galaxy A6+.
- Someone who has some corrupted OS files on your Galaxy A6.
- For someone who is going through the infamous android bootloop on your Galaxy A6+.
Before proceeding any further lets have an idea on the term, Stock ROM.
What is a stock ROM/firmware?
This is strictly for educational purpose only. If somebody is telling you to install the stock ROM while you are facing an issue like the one mentioned above with your phone, you may be confused,
What is a Stock ROM?
Stock ROM is simply the firmware which was pre-installed on your Galaxy A6 Plus (or any phone) when it came from the factory.
Now you might be thinking, I am not a technical person, so it will be difficult for me to install the stock ROM on my device, don’t worry it is as simple as picking an apple from an apple tree.
Note: When proceeding with the further steps please make a complete backup of your device storage including contacts, multimedia file etc if you are able to do so.
Steps to install the stock ROM/firmware on Samsung Galaxy A6+ (All models)
1. Before starting the whole procedure lets download all the required files. There are two number of files required for flashing. The first one is the firmware itself and the second one is the “Odin” application to flash the file to your Galaxy A6 Plus.
The firmware files are named as per their model number. Please find the correct model number/region and download it.
When you click any of the the below links you will be directed to another page where you need to select the file according to the country/region. Please note that for Galaxy A6+, the stock firmware version is Android Oreo 8.0.
- Download Samsung Galaxy A6+ SM-A605F Stock Firmware
- Download Samsung Galaxy A6+ SM-A605FN Stock Firmware
- Download Samsung Galaxy A6+ SM-A605G Stock Firmware
- Download Samsung Galaxy A6+ SM-A605GN Stock Firmware
- Download Samsung Galaxy A6+ SM-A6050 Stock Firmware
- Download Samsung Galaxy A6+ SM-A605K Stock Firmware
- Download Odin3 v3.13.1
2. Once the downloading is finished you need to enable the “USB debugging mode” on your Galaxy A6+. To enable it please go to settings menu and gave a check mark to “USB debugging” from the “Developer options“.
Alternately you can follow the below tutorial which will give you detailed info on enabling the USB debugging on your phone.
3. Now after enabling the USB debugging you need to switch it off and enter it into the download mode. For that when in power down status please press and hold “Power” + “Vol Down” buttons at the same time to enter into download mode. Once you get a warning screen press “Vol Up” to enter into the “Download Mode“.
4. Once in “Download Mode”, please open the Odin application with administrative privileges on your PC. Now connect your A6 using the USB data cable to your computer. If the connection was successful you will get an “Added” message from the Odin application. If you didn’t get the “Added” message please reinstall the Samsung USB drivers and try again. The USB drivers can be downloaded from the below given link.
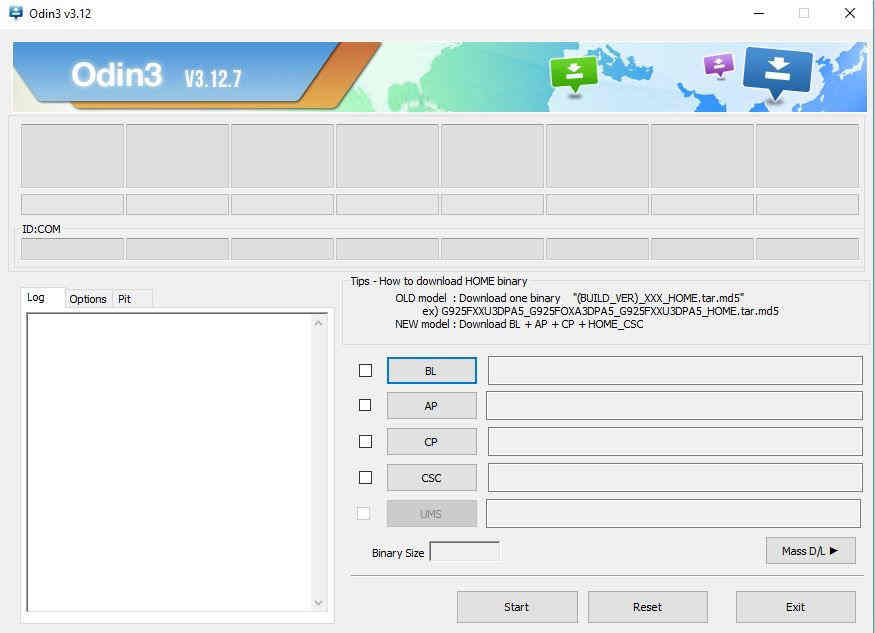
5. As all the prerequirements are satisfied now, lets start the flashing process. For that please click the “AP” button from the Odin window and select the “tar.md5” which you have downloaded and unzipped before. When done please click the “Start” button to initiate the flashing process. Now wait till the procedure is completed and until the phone is rebooted
Once the flashing process is completed you will get a “Pass” message from the Odin application. You may now confirm the software version of your Galaxy A6 Plus from the settings menu.
Sometimes bad things can happen, so if you are thrown into an endless android bootloop after this procedure please resolve it by following the below given tutorial. Don’t worry because boot loop is a glitch in android firmware which can be resolved easily.
Normal queries: Install Stock ROM on Galaxy A6+ 2018
- Install stock ROM/firmware on Samsung Galaxy A6+ SM-A605F?
- How to install stock ROM/firmware on Samsung Galaxy A6+ SM-A605FN?
- Install stock ROM/firmware on Samsung Galaxy A6+ SM-A605G
- How to install stock ROM/firmware on Samsung Galaxy A6+ SM-A605GN?
- Install stock ROM/firmware on Samsung Galaxy A6+ SM-A6050
- How to install stock ROM/firmware on Samsung Galaxy A6+ SM-A605K?
If you have faced any issues while installing the Stock ROM on Galaxy A6+, please feel free to post it in the comment section below, don’t worry I will help you as fast as I can.
If “How To Install Stock ROM (Oreo 8.0) On Galaxy A6+ (2018)? (All Models)” tutorial really helped you, please give a like/share on social networking websites by using the below given buttons.