Hi friends, this tutorial will help you to enable USB Debugging And OEM Unlocking on your Samsung’s Galaxy Smartphone with One UI.
Starting from the all new One UI on the Samsung Galaxy Android Smartphones a lot has changed when it comes to settings menu navigation. So how can we get to know the changes, don’t worry because we are going to write exclusive tutorials on every settings menu items and how to navigate there.
However, today we are concentrating on enabling USB Debugging And OEM Unlocking only.
Before proceeding, what is USB Debugging And OEM Unlocking?
a. USB Debugging
When USB Debugging is enabled your Android device can communicate with the “Android Software Developer Kit” using a USB connection (USB data cable). When this feature is enabled your phone can receive commands, files from any connected PC. It also allows the connected computer to pull log files from your Android device.
b. OEM Unlocking
OEM stands for Original Equipment Manufacturer. So OEM is locked by default by your manufacturer on your Android Smartphone starting from version 5.0. A locked OEM prevents the bootloader from being unlocked and restricts the installation of custom ROMs and root. It also restricts editing system files and accidentally deleting it.
This is done to protect your phone from getting bricked by a non technical user who is not at all aware about what they are using.
Any loss or unwanted edits on the android system files may result in the following;
- Phone becomes unstable
- Loss of data
- Privacy vulnerabilities
- Phone may get bricked
So to save you from all this hustle the manufacturer locks the OEM by default.
Now lets go to our tutorial objective finally.
Please note that these steps will not unlock the bootloader if you are locked to any carrier. This is only for international unlocked phones when enabled can install root, custom ROM and firmware.
Steps To Enable/Activate USB Debugging And OEM Unlocking On Samsung Galaxy Android Phone With One UI
1. First tap on the “Settings” icon in your app drawer. Once tapped you will get the below screen.
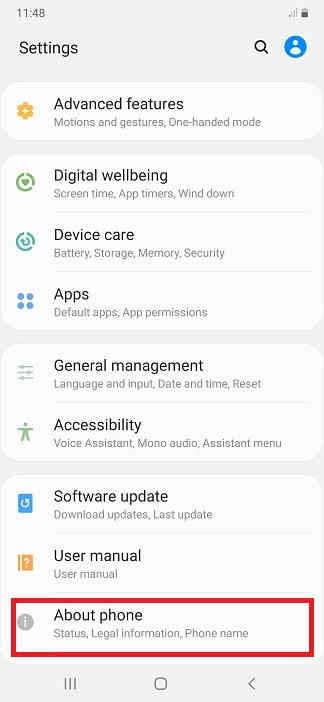
2. Here tap on “About phone” and you will get the below page.
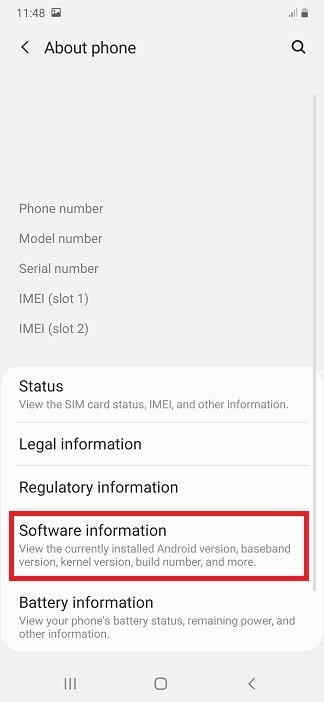
3. Here tap on “Software information” and you will get the below screen.
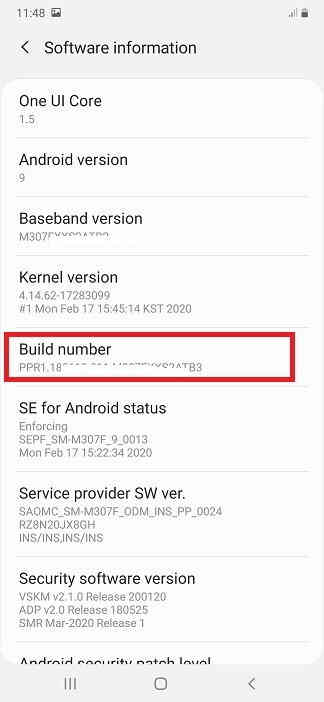
4. Now in this page tap on “Build number” 10 times or untill you get the popup “You are now a developer” to enable the “Developer options“. Next go back to the previous menu now and you will be able to see the “Developer options” at the bottom of the previous page.
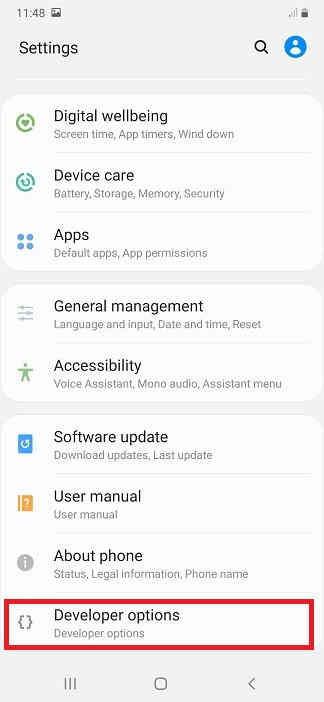
5. In the next step tap on “Developer options” and you will get the below screen.
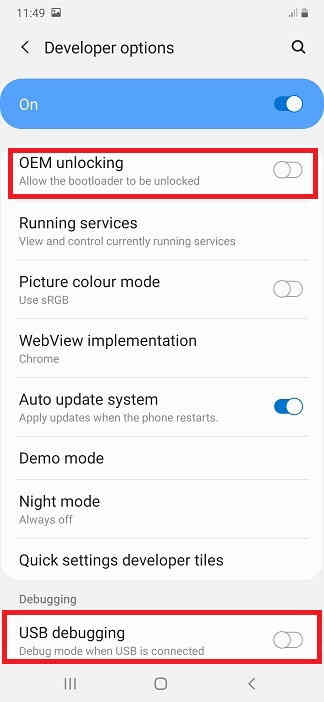
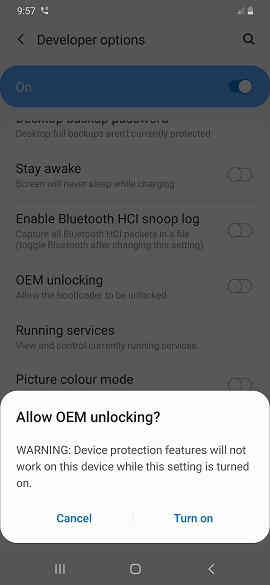
6. Here tap on “OEM unlocking” and you will get the below warning. Now tap on “Turn on” to activate the “OEM unlocking“.
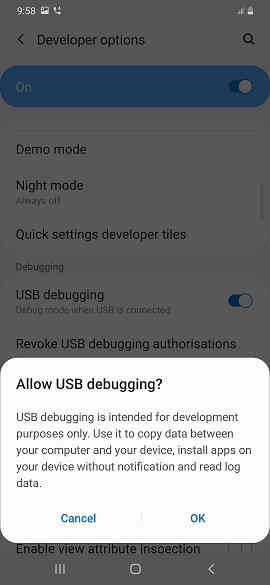
7. To enable “USB debugging” tap on the corresponding menu entry and you will get the below warning. Now same way tap on “Turn on” to activate the “USB debugging“.
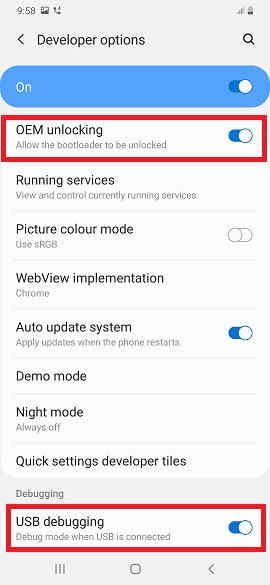
When everything is enabled you will get the page as shown below.
If you are still confused please have a look at this video;
That’s it friends, that’s all you need to do to enable USB Debugging And OEM Unlocking on your Samsung’s Galaxy Smartphone running on One UI.
If you have faced any issues while trying to enable USB Debugging and OEM Unlocking on your Samsung Galaxy One UI, please feel free to post it in the comment section below so that everybody will benefit from it.
If “How To Enable USB Debugging And OEM Unlocking On Samsung’s Galaxy One UI?” tutorial really helped you, please give a like/share on social networking websites by using the below given buttons.
