In this tutorial I will help you to install the official and unofficial TWRP 3.7.0 on your Samsung Galaxy S10 (Exynos), Samsung Galaxy S10 (Snapdragon), Samsung Galaxy S10 5G (Exynos), Samsung Galaxy S10 5G (Snapdragon), Samsung Galaxy S10+ (Exynos), Samsung Galaxy S10+ (Snapdragon), Samsung Galaxy S10e (Exynos), Samsung Galaxy S10e (Snapdragon) and Samsung Galaxy S10 lite (Snapdragon).
Please note that this method is compatible on below models only;
- Samsung Galaxy S10 : SM-G973F (Exynos)
- Samsung Galaxy S10 : SM-G973U, SM-G973W, SM-G973U1 (Snapdragon)
- Samsung Galaxy S10 5G : SM-G977B (Exynos)
- Samsung Galaxy S10 5G : G9770, G977U, G977U1 and G977W (Snapdragon)
- Samsung Galaxy S10+ : SM-G975F (Exynos)
- Samsung Galaxy S10+ : SM-G975U, SM-G975W, SM-G975U1 (Snapdragon)
- Samsung Galaxy S10e : SM-G970F (Exynos)
- Samsung Galaxy S10e : SM-G970U, SM-G970W, SM-G970U1 (Snapdragon)
- Samsung Galaxy S10 lite : G770U, G770W, G770F (Snapdragon)
Before proceeding with the actual tutorial first let me give you brief idea about what is TWRP
What is TWRP Recovery?
TWRP stands for “Team Win Recovery Project” and it is an open-source custom recovery image for Android Smartphones. A custom recovery image allows users to perform various tasks like flashing Custom ROMs, Creating and Restoring Backups, Wiping Data, Flashing Custom Kernels and Mods, Mounting, Managing File Systems, ADB sideload and terminal access. To use TWRP, you typically need to unlock your device’s bootloader
Please keep in mind that installing custom recoveries may void your warranty or even potentially lead to a bricked device if not used carefully. SamsungSFour.com is liable for any issues caused as a result of this tutorial.
Steps To Install TWRP 3.7.0 for Samsung Galaxy S10, S10 5G, S10 Plus 5G, S10e & S10 Lite
If your phone is already rooted then you don’t have to go through these tiring steps. You can go straightaway and flash the TWRP, if not please follow this tutorial.
First you need to download the necessary files from the below given links;
Downloads
Patched vbmeta image Downloads
TWRP Downloads
- TWRP For Samsung Galaxy S10 : SM-G973F (Exynos)
- TWRP For Samsung Galaxy S10 : SM-G973U, SM-G973W, SM-G973U1 (Snapdragon)
- TWRP For Samsung Galaxy S10 5G : SM-G977B (Exynos)
- TWRP For Samsung Galaxy S10 5G : G9770, G977U, G977U1, G977W (Snapdragon) (twrp-3.7.0_12-1_afaneh92-beyondxq)
- TWRP For Samsung Galaxy S10+ : SM-G975F (Exynos)
- TWRP For Samsung Galaxy S10+ : SM-G975U, SM-G975W, SM-G975U1 (Snapdragon)
- TWRP For Samsung Galaxy S10e : SM-G970F (Exynos)
- TWRP For Samsung Galaxy S10e : SM-G970U, SM-G970W, SM-G970U1 (Snapdragon)
- TWRP For Samsung Galaxy S10 lite : G770U, G770W, G770F (Snapdragon) (twrp-3.7.0_12-1_afaneh92-r5q)
1. Unlock Bootloader on Samsung Galaxy S10, S10 5G, S10+, S10e & S10 Lite
First you need to unlock bootloader on your Samsung Galaxy S10.
1. First you need to enable developer mode and enable “OEM Unlock” options from “Settings” menu.
For that, first tap on the “Settings” icon in your app drawer. Once tapped you will get the below screen.
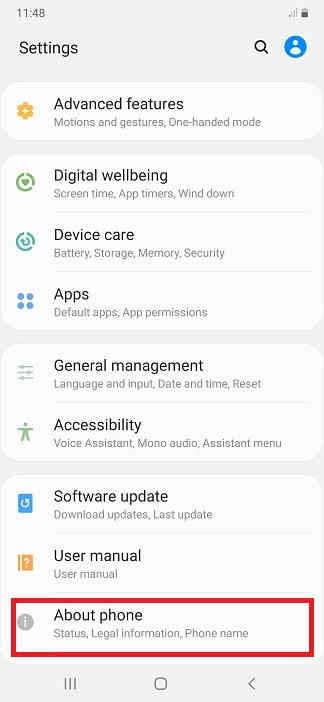
Here tap on “About phone” and you will get the below page.
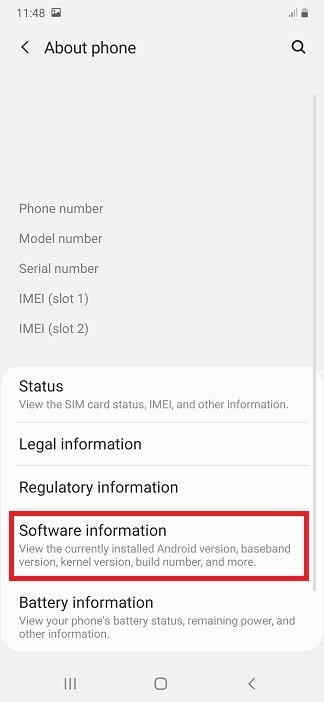
Here tap on “Software information” and you will get the below screen.
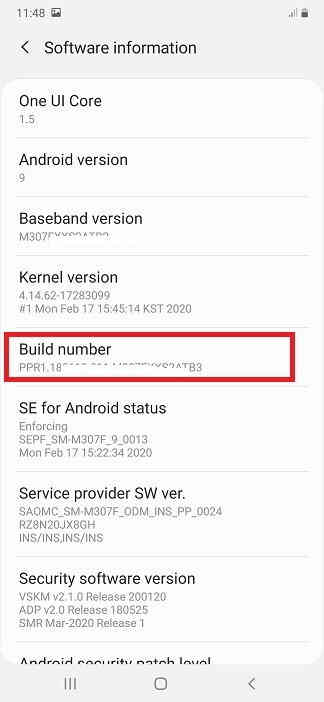
Now in this page tap on “Build number” 10 times or until you get the popup “You are now a developer” to enable the “Developer options“. Next go back to the previous menu now and you will be able to see the “Developer options” at the bottom of the previous page.
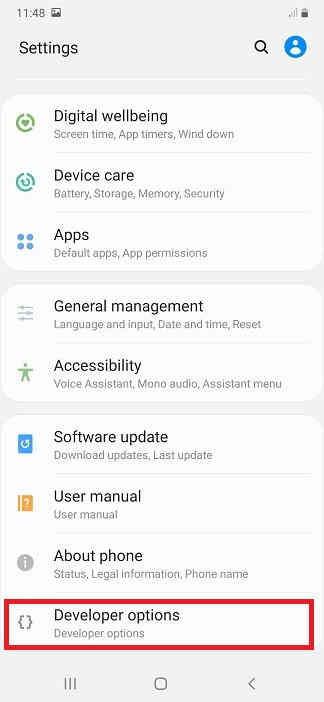
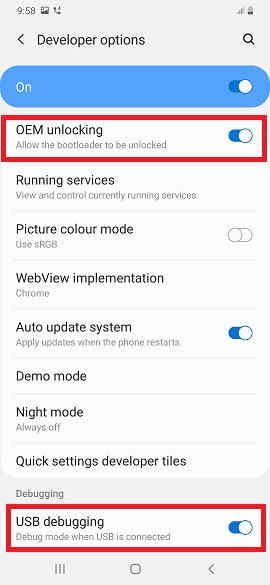
In the next step tap on “Developer options” and you will get the below screen.
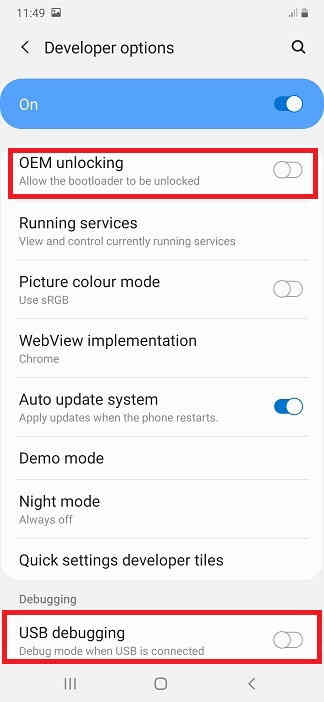
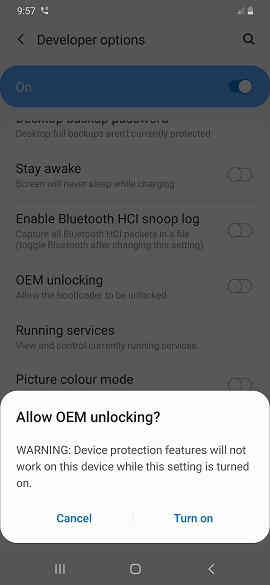
Here tap on “OEM unlocking” and you will get the below warning. Now tap on “Turn on” to activate the “OEM unlocking“.
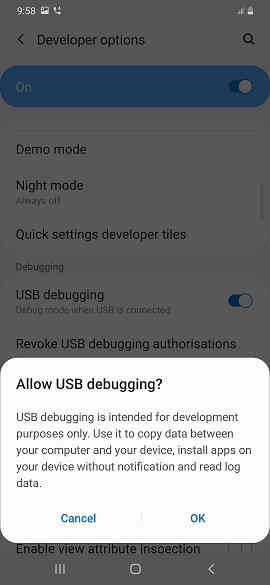
To enable “USB debugging” tap on the corresponding menu entry and you will get the below warning. Now same way tap on “Turn on” to activate the “USB debugging“.
When everything is enabled you will get the page as shown below.
If you are still confused please have a look at this video tutorial.
Once the bootloader is unlocked, you need to enter your Galaxy S10 into Download Mode.
2. Entering Download mode on Samsung Galaxy S10, S10 Plus, S10e, S10 Lite and Flashing TWRP
For that first switch of your Galaxy S10. Now press and hold the “Vol Up” + “Vol Down” buttons at the same time and connect your phone to PC using a USB data cable at the same time. Once done press “Vol Up” again a single time to enter into the “Download mode“.
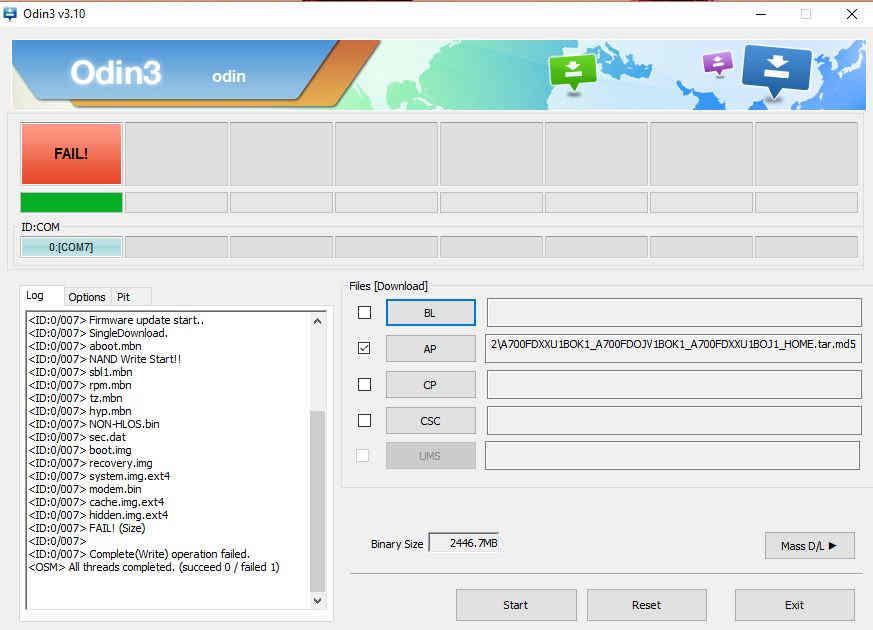
This is a representative image only.
Now open the Odin app and click on “AP” button and select the corresponding TWRP.tar file and click “USERDATA” and select the already downloaded “patched vbmeta image” (for official TWRP you don’t need to add the “vbmeta” file). Once done please click on the “Start” button in the Odin app to begin the flashing process.
Once finished please reboot your phone into the recovery mode and do a Wipe>Format Data from TWRP recovery mode menu.
Now restart the device after removing the USB data cable from your PC. Once done you are good to go.
Hope this helped!
Normal Queries to install TWRP 3.7.0 On Samsung Galaxy S10
- How to download and Install TWRP 3.7.0 on Samsung Galaxy S10 5G, Galaxy S10+, Galaxy S10e or Galaxy S10 Lite?
- Install custom recovery on Galaxy S10, Galaxy S10+, Galaxy S10e or Galaxy S10 Lite
- Install Team Win Recovery on Galaxy S10
- How to enter TWRP on Samsung Galaxy S10?
If you have faced any issues while trying to install TWRP 3.7.0 On Samsung Galaxy S10, please feel free to contact us, don’t worry we will help you as fast as we can.
If “How To Install TWRP 3.7.0 On Samsung Galaxy S10? (All Models)” tutorial really helped you, please give a like/share on social networking websites.
